|
For the third Marking Period, I started creating four to five day projects that allow students to experience the design process, also known as the engineering process. A video from Teaching Channel was passed on to me by a colleague, Janissa Nuneville, and I immediately knew I wanted to do this project! Granted it's been a couple years since she showed it to me, but I finally had the opportunity to put it into practice.
I love how the teacher in this class was the facilitator, not the bearer of knowledge trying to cram information into these kids' heads. Instead the learning took place through inquiry; the kids were excited about the project and it gave them a purpose for learning about energy and motion. |
|
Unlike the class in the video that spent weeks on this project as part of their Science unit, I see my kids between three and five days, depending on snow days, holidays, professional development, and parent conferences. Needless to say, we can not get as in depth as the other class. That doesn't mean, however, that we couldn't make it work!
I also designed this project with third grade in mind, not middle school. At the third grade level, students are not exposed to concepts like kinetic and potential energy so unlike the class in the video, the transfer of energy was not our focus. Instead, our focus was on the design process. [Update: I also tried this project with Fourth grade and think it is perfect for them.]
I also designed this project with third grade in mind, not middle school. At the third grade level, students are not exposed to concepts like kinetic and potential energy so unlike the class in the video, the transfer of energy was not our focus. Instead, our focus was on the design process. [Update: I also tried this project with Fourth grade and think it is perfect for them.]
The Design Process
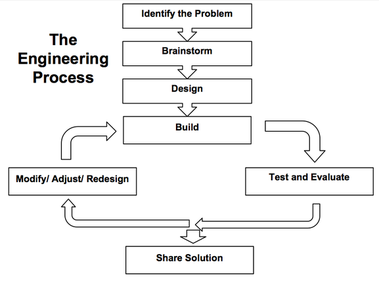
How I "Wilburized" it
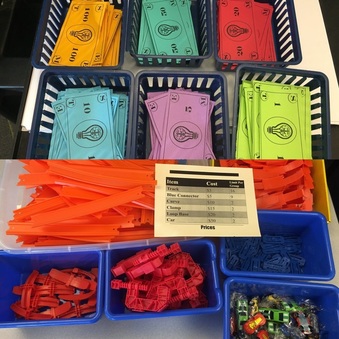
As previously mentioned, I used the Teaching Channel video as inspiration for the project, but had to adjust it for my younger kids, our time frame of a week, and the materials I have readily available. Another colleague of mine and fourth grade teacher at this school, Le'Toya Chisholm, had submitted a form on the Hot Wheels website for a free classroom Speedometry kit. When she received the kit, she donated it to my class, thanks again Le'Toya!! :) The kit includes: 40 Hot Wheels cars, 16 orange loop bases, 16 red clamps, 64 blue track connectors, and 100+ feet of orange track.
Because I had these materials readily available, I opted to use them instead of marbles and tubing insulation... and the mention of Hot Wheels perked the kids right up! They couldn't wait to get their hands on those orange tracks when we began the project. In fact, the materials caught their eye as soon as they walked in the classroom and were immediately wondering what they were going to be doing.
Designing on a budget
 Students had a $200 budget to buy the materials for their roller coaster.
Another thing I loved about the video was the idea of the kids buying the materials and working on a budget. I have seven groups of four. I figured out based on the number of materials that came in the kit, how I could evenly split them between the seven groups. For instance, there were 16 clamps in the kit, so I knew that each group could have two clamps total, to be fair. Then I made two the limit for the amount of clamps they could buy. I repeated this process for all the materials.
Next I decided that I was going to use the same denominations of money that United States uses so that the buying experience was more realistic. I made $1, $5, $10, $20, $50, and $100 bills in "STEM money". I decided to make actual paper money instead of having the kids work off a spreadsheet to make the project more fun and kinetically pleasing. I priced out the materials kind of randomly, mostly by size and by how many the students would need. In other words, tracks and connectors are smaller and I knew their roller coasters would need a lot of them, so I priced them cheaply at $3 and $5 respectively. The loop base is much larger and the students could only buy two of them, so I made it worth $20.
To determine the budget, I figured out how much it would cost the students if they bought the maximum number allowed for each item. Then I rounded down so that they would NOT have enough money to buy everything. I wanted the students to experience trade-off when deciding how to spend their money. The number I landed on was $200 per group. An awesome moment for me was when one group realized they didn't have enough money to get everything they wanted. They looked so shocked and disappointed. What a great life lesson they were experiencing! Then they started again by talking about what items they needed for their design. "We don't really need two cars..." I overheard one of them saying.
 RSS Feed
