|
For the third Marking Period, I started creating four to five day projects that allow students to experience the design process, also known as the engineering process. A video from Teaching Channel was passed on to me by a colleague, Janissa Nuneville, and I immediately knew I wanted to do this project! Granted it's been a couple years since she showed it to me, but I finally had the opportunity to put it into practice.
I love how the teacher in this class was the facilitator, not the bearer of knowledge trying to cram information into these kids' heads. Instead the learning took place through inquiry; the kids were excited about the project and it gave them a purpose for learning about energy and motion. |
|
Unlike the class in the video that spent weeks on this project as part of their Science unit, I see my kids between three and five days, depending on snow days, holidays, professional development, and parent conferences. Needless to say, we can not get as in depth as the other class. That doesn't mean, however, that we couldn't make it work!
I also designed this project with third grade in mind, not middle school. At the third grade level, students are not exposed to concepts like kinetic and potential energy so unlike the class in the video, the transfer of energy was not our focus. Instead, our focus was on the design process. [Update: I also tried this project with Fourth grade and think it is perfect for them.]
I also designed this project with third grade in mind, not middle school. At the third grade level, students are not exposed to concepts like kinetic and potential energy so unlike the class in the video, the transfer of energy was not our focus. Instead, our focus was on the design process. [Update: I also tried this project with Fourth grade and think it is perfect for them.]
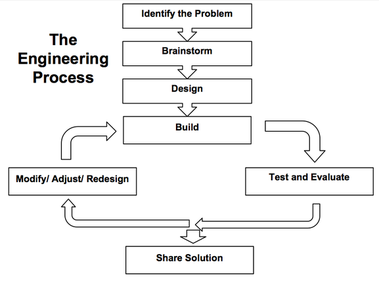
The Design Process
How I "Wilburized" it
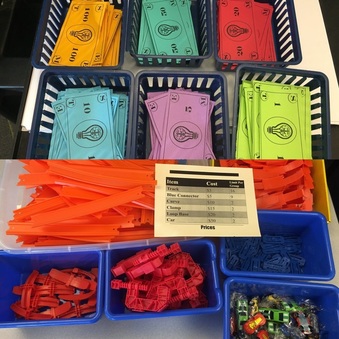
As previously mentioned, I used the Teaching Channel video as inspiration for the project, but had to adjust it for my younger kids, our time frame of a week, and the materials I have readily available. Another colleague of mine and fourth grade teacher at this school, Le'Toya Chisholm, had submitted a form on the Hot Wheels website for a free classroom Speedometry kit. When she received the kit, she donated it to my class, thanks again Le'Toya!! :) The kit includes: 40 Hot Wheels cars, 16 orange loop bases, 16 red clamps, 64 blue track connectors, and 100+ feet of orange track.
Because I had these materials readily available, I opted to use them instead of marbles and tubing insulation... and the mention of Hot Wheels perked the kids right up! They couldn't wait to get their hands on those orange tracks when we began the project. In fact, the materials caught their eye as soon as they walked in the classroom and were immediately wondering what they were going to be doing.
Designing on a budget
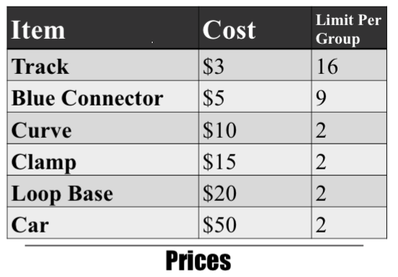
 Students had a $200 budget to buy the materials for their roller coaster.
Another thing I loved about the video was the idea of the kids buying the materials and working on a budget. I have seven groups of four. I figured out based on the number of materials that came in the kit, how I could evenly split them between the seven groups. For instance, there were 16 clamps in the kit, so I knew that each group could have two clamps total, to be fair. Then I made two the limit for the amount of clamps they could buy. I repeated this process for all the materials.
Next I decided that I was going to use the same denominations of money that United States uses so that the buying experience was more realistic. I made $1, $5, $10, $20, $50, and $100 bills in "STEM money". I decided to make actual paper money instead of having the kids work off a spreadsheet to make the project more fun and kinetically pleasing. I priced out the materials kind of randomly, mostly by size and by how many the students would need. In other words, tracks and connectors are smaller and I knew their roller coasters would need a lot of them, so I priced them cheaply at $3 and $5 respectively. The loop base is much larger and the students could only buy two of them, so I made it worth $20.
To determine the budget, I figured out how much it would cost the students if they bought the maximum number allowed for each item. Then I rounded down so that they would NOT have enough money to buy everything. I wanted the students to experience trade-off when deciding how to spend their money. The number I landed on was $200 per group. An awesome moment for me was when one group realized they didn't have enough money to get everything they wanted. They looked so shocked and disappointed. What a great life lesson they were experiencing! Then they started again by talking about what items they needed for their design. "We don't really need two cars..." I overheard one of them saying.
Roles for Engagement
In order to make sure all students were engaged and valued in their group during the project, I created four roles. The roles were: Accountant, Materials Operator, Project Manager, and Recorder.
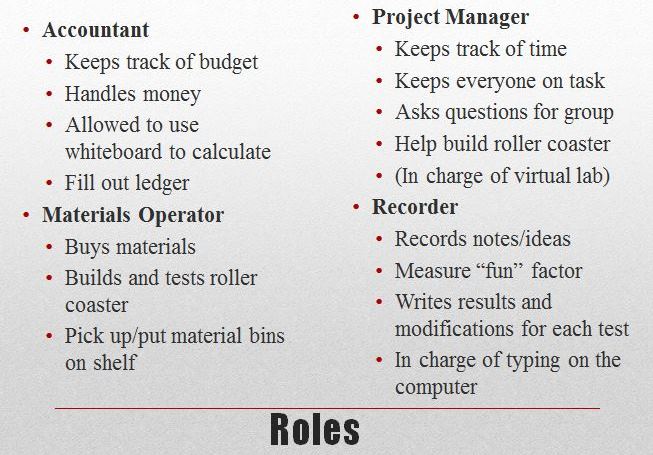
[Update: Project manager now also helps build the roller coaster and the recorder drops the car. On the first day, during the brainstorming/research phase, the recorder is also in charge of the computer for the virtual lab (not project manager as depicted in image above.)]
So far I let the students choose the roles within their group. If a group had only 3 people, I told them that the Recorder should also cover the Project Manager position. I purposefully didn't tell them to disregard it completely because that might make project managers in other groups feel the least important. In truth, I tried to make all the roles equal in value, importance, and workload.
I felt that if students chose their role, or negotiated the roles as a team, they might buy into it more. When groups could not decide fairly, "Rocks, Paper, Scissors" solved many arguments. Another option for groups who wanted the same role was allowing them to split it- one student takes it the first few days, then the other student gets a turn. I am still on the fence about having kids stay in their role all week (for the whole project), versus switching each day. The benefit to staying in their role is that they get efficient at it and do it well. The disadvantage is that other students will not get to experience it. For instance, the accountant will be the one doing math all week. [Update: After doing this project several times, I noticed that students helped each other with their role duties. Meaning that often the groups worked together to figure out the math part and the accountant kept track of the money and wrote it all down. Also they all had a hand in the building even though it was specifically assigned to certain roles; they were good at sharing and including everyone... most of the time.][Update #2: Project manager now also helps build the roller coaster and the recorder drops the car. On the first day, during the brainstorming/research phase, the recorder is also in charge of the computer for the virtual lab (not project manager as depicted in image above.)]
I felt that if students chose their role, or negotiated the roles as a team, they might buy into it more. When groups could not decide fairly, "Rocks, Paper, Scissors" solved many arguments. Another option for groups who wanted the same role was allowing them to split it- one student takes it the first few days, then the other student gets a turn. I am still on the fence about having kids stay in their role all week (for the whole project), versus switching each day. The benefit to staying in their role is that they get efficient at it and do it well. The disadvantage is that other students will not get to experience it. For instance, the accountant will be the one doing math all week. [Update: After doing this project several times, I noticed that students helped each other with their role duties. Meaning that often the groups worked together to figure out the math part and the accountant kept track of the money and wrote it all down. Also they all had a hand in the building even though it was specifically assigned to certain roles; they were good at sharing and including everyone... most of the time.][Update #2: Project manager now also helps build the roller coaster and the recorder drops the car. On the first day, during the brainstorming/research phase, the recorder is also in charge of the computer for the virtual lab (not project manager as depicted in image above.)]
More about the money
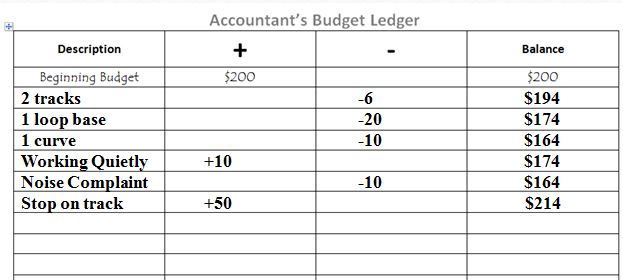
[Update: I eliminated one of the middle columns in the chart and made it + or -. Now the students write how much of an item they bought (description), how much it would cost OR how much money was earned/gained, and then the remaining/new balance. It has made the ledger much less confusing for the kids.]
One of the most important tasks in this project was the Accountant ledger. Students had to plan out how they were going to spend their budget of $200. On the other hand, they also had to know how much money they had left and where their money went. I created a chart for accountants to fill out throughout the project. Whenever the group bought materials, it was the accountant's job to add it to the ledger, subtract the total amount needed to buy the materials, and then calculate the new balance. I gave each accountant a white board to help with their math (no calculators). There were some third graders who did a really nice job with the ledger, but generally speaking this is something they struggled with. I will continue to look for ways to make it more kid friendly. The most common problems with the ledger included: students not understanding that it's add OR subtract, so one of those boxes should have been blank, that the "balance" should have matched the physical money that they had left, anytime they bought something new they needed to record it on the ledger, and they needed to fix the ledger when they "returned" materials and got money back. [Update: As part of the brainstorming phase of the project, I made the groups plan out what they were going to buy and write it in the ledger BEFORE they could go shopping the first time. The whole group worked together to figure out what they could afford. This worked well because (1) they couldn't go shopping until I checked the ledger so it had to be done, and (2) it made the buying process go much faster.][Update #2: I eliminated one of the middle columns in the chart and made it + or -. Now the students write how much of an item they bought (description), how much it would cost OR how much money was earned/gained, and then the remaining/new balance. It has made the ledger much less confusing for the kids.]
One thing that made this project more exciting, but may have added to the confusion, was that groups could earn money too! Some reasons I gave out money were: working hard, working quietly, being respectful towards each other, having their ledger filled out correctly, cleaning up quickly, having creative ideas (example: a hill in their roller coaster). I've noticed that the students worked even harder, quieter, and quicker as they are looking for ways to get some "dough" so they could buy more stuff!
The students got very excited about this project, especially when they celebrated parts of their roller coaster that worked well. To keep the noise volume down, I let students know that I could file a "noise complaint" against their group and they had to pay me $10. That was helpful and students learned quickly after one complaint to try to keep quiet because they wanted to buy more things with their money, not waste it. Wandering away from their table is another way groups could lose money.
I "opened the store" for ten minute chunks of time in class. Then I "closed" it so that I could walk around and conference with each group. It was funny to see how antsy kids got when the store was closed... they couldn't wait for me to reopen! I felt that it taught another great life lesson- you can't always get what you want, when you want it. Sometimes you have to be patient and wait. And it was realistic since stores in real life close and sometimes you just have to wait until the next day. Closing the "store" also gave students a chance to plan out what they needed next, especially since they did not want to forget anything before it closed again. I did not have a set schedule for "opening" and "closing" the store; it depended on groups' needs and how quickly I could see everyone's progress and check their paperwork.
When I say "store", I'm referring to the table where I had materials in bins ready to be bought, and a cart for me. My "register" consisted of a rolling cart where students brought their items. I counted them out and gave them change. I had my money separated by denomination in small trays. It made it easy for me to give and get bills easily and neatly.
Modifications
The roller coaster was supposed to be fun and safe. We measured "safety" by whether or not the car stayed on the track. I found that students were flinging the cars really hard to make them go around the loop and then at the end of the ride, the car crashed or went rolling off somewhere on the floor. I added to the criteria that "safe" also meant the car stopped by itself at the end of the track (or at least on the track). It was really interesting to see the kids rework their design to incorporate this new criteria. It also unconsciously got the students thinking about forces because they had to change the speed of the car multiple times along the ride. At first they needed to make sure there was enough force and speed to make the car get around the loop. Then they needed to figure out how to slow it down to a stop by itself. It was impressive to see groups figure out that hills could help, or having the end of their track be long enough to stop or on an uphill angle to helped slow the car down. The "fun" factor was the criteria of one required loop.
The recorder was in charge of completing the graphic organizer that has a spot to draw out the design of the roller coaster. Their drawing should have had labels on it. And also there was a chart where they recorded modifications that were made to the design and why. The purpose of the graphic organizer was to collect evidence of the design process, particularly the part where students must redesign and make improvements. I found that students didn't realize the word "modification" means changes made. Going forward I will add "modification" as a vocabulary word to preview.
The recorder was in charge of completing the graphic organizer that has a spot to draw out the design of the roller coaster. Their drawing should have had labels on it. And also there was a chart where they recorded modifications that were made to the design and why. The purpose of the graphic organizer was to collect evidence of the design process, particularly the part where students must redesign and make improvements. I found that students didn't realize the word "modification" means changes made. Going forward I will add "modification" as a vocabulary word to preview.
Extension
If we had more time, my plan was to also have students take measurements of their roller coasters. The longer the ride, the more "fun" it was. Another thing we could have measured was speed. The faster the ride, the more "fun" it would be. We would have needed timers to find the speed; by taking the total length of the tracks- including the circumference of the loop- and dividing it by the total time it took the car to travel from start to finish. The speed would have been in cm/s or m/s depending on the unit of measurement we used for length.
Another advantage to doing this project with fourth graders instead is to team up with their teacher as they learn about forces and motion in Science. Students could complete this project as an interdisciplinary activity where they learn about the scientific phenomenon occurring within their roller coaster and do the actual designing and building in my class.
Another advantage to doing this project with fourth graders instead is to team up with their teacher as they learn about forces and motion in Science. Students could complete this project as an interdisciplinary activity where they learn about the scientific phenomenon occurring within their roller coaster and do the actual designing and building in my class.
Innovative Ideas
It has been a lot of fun watching the students work together to create their roller coaster. As I mentioned earlier, they have incorporated hills and "ramps" to change their motion of their car. They have also explored how the starting height of their first hill affected the speed and ability of the car to get around the loop. I had to explain how the clamp works, but once I did, students' designs got even more creative as they started finding new surfaces to build on such as going off the edge of the table, across or under their chairs, or even hooked up to the bookcases around the room.
Virtual Simulation
The "brainstorming" phase of the design process includes researching. I found the simulation shown in the Teaching Channel video and it was awesome! After I explained the project, had students figure out their roles, and we identified the problem with criteria and constraints, we used the online simulation to brainstorm. I gave one laptop to each group. The recorder was in charge of controlling the computer while the others looked on and verbally expressed their ideas.
The kids LOVED it! The online simulation is very realistic and while it focuses on kinetic and potential energy, the students were naturally going through the design process as they had to make modifications to their layout when either: (1) the car(s) got stuck going up a hill or around a loop, or (2) the car(s) crashed at the end. The simulation also got kids thinking about how they could incorporate hills to change the speed of their car. After experimenting with the simulation, the groups then brainstormed how they could create their roller coaster in real life with the Hot Wheels materials they could afford. Many students reported that they continued to play with the online simulation at home after school.
The kids LOVED it! The online simulation is very realistic and while it focuses on kinetic and potential energy, the students were naturally going through the design process as they had to make modifications to their layout when either: (1) the car(s) got stuck going up a hill or around a loop, or (2) the car(s) crashed at the end. The simulation also got kids thinking about how they could incorporate hills to change the speed of their car. After experimenting with the simulation, the groups then brainstormed how they could create their roller coaster in real life with the Hot Wheels materials they could afford. Many students reported that they continued to play with the online simulation at home after school.
Reflection
Having students think back on their experiences and reflect on their journey through the design process was one of the most important parts of the week. Yes, the recorder was documenting their journey along the way but taking time for self-reflection allowed ALL students, no matter which role they were in, the opportunity to grow. At the end of each day, I asked students to do two rounds of "Single Round Robin" (a Kagan cooperative learning structure where students in the group take turns talking). On the first round, students stated one thing they thought went well that day. On the second round, they stated one thing they would like to try and/or improve the following day.
Closing Remarks
Overall, this project was a favorite for the students and myself! It had many elements embedded in it and it was well planned. The physical money and Hot Wheels materials were the two things that made the biggest impression on the students. They also continued to revisit the virtual simulation after the project was over. Check out and help yourself to the materials below that I use to facilitate this project.
Your comments are welcome! I'd love to hear from you :)
Do you have a Maker Space or implement STEM activities? Are you thinking about it? I'd love to hear your ideas!
 RSS Feed
